Foxit PDF SDK for Web 概述
通过Foxit PDF SDK for Web,开发人员可以部署和定制Foxit PDF SDK for Web以实现在网页浏览器上浏览PDF文档。将Foxit PDF SDK for Web集成到Web应用程序中,终端用户可在桌面和移动设备上阅读PDF文档,而无需在本地额外安装任何软件。
为什么选择Foxit PDF SDK for Web
Foxit 是领先的PDF软件解决方案供应商,专注于PDF显示、编辑、创建、管理以及安全方面。Foxit PDF SDK for Web是一款跨平台的在线PDF阅读解决方案,其企业版已被全球众多知名公司选择并集成到他们的解决方案中。选择Foxit PDF SDK for Web的几大理由:
灵活定制
程序开发人员可轻松地设计Foxit PDF SDK for Web界面所需要的风格,并使其与他们的Web应用程序保持一致。
易于集成
程序开发人员可以通过引用Foxit PDF SDK for Web的资源文件并编写少量代码来显示和编辑PDF文档,以及使用更丰富的接口来连接用户和用户数据。
标准化和一致性的注释数据
Foxit PDF SDK for Web上的注释数据能在其他标准的PDF应用中显示和编辑。
基于福昕高保真的PDF渲染引擎
Foxit PDF SDK for Web的核心技术是基于世界众多知名企业所信赖的福昕PDF引擎。福昕强大的PDF引擎可快速解析和渲染文档,不受设备环境的约束。
另外,用户可以选择购买产品相关的维护服务,福昕专业的技术支持团队将竭诚为您服务。我们的产品将定期地进行更新改进。因此,若您需要开发一款跨平台的web PDF文档阅读器,选择高性价比的Foxit PDF SDK for Web实为明智之举。
文档读者和范畴
该文档主要适用于需要将Foxit PDF SDK for Web集成到其Web应用程序中的开发人员。它涵盖了可以直接引用的示例代码以及用于自定义的前端API。
你的Web应用程序
Foxit PDF SDK for Web允许Web应用程序无缝地显示PDF,而无需安装任何插件或者本地软件。在使用Foxit PDF SDK for Web之前,开发人员需要准备一台存放PDF的主机服务器,比如Nginx、Apache或者Node.js平台的HTTP服务,并且进行常规的配置。
评估
用户可申请下载Foxit PDF SDK for Web的试用版本进行试用评估。试用版除了有15天的免费试用以及生成的PDF页面上会有试用水印以外,其他都和标准版一样。当试用期到期后,用户需联系福昕销售团队并购买licenses以便继续使用Foxit PDF SDK for Web。
License
程序开发人员需购买licenses才能在其解决方案中使用Foxit PDF SDK for Web。Licenses授予用户发布基于Foxit PDF SDK for Web开发的应用程序的权限。然而,在未经福昕软件公司授权下,用户不能将Foxit PDF SDK for Web包中的任何文档、示例代码以及源代码分发给任何第三方机构。
入门指南
Foxit PDF SDK for Web提供了丰富的PDF操作功能,以及多层次化的API接口,包括从无UI的API接口到简单UI渲染、自定义UI、以及复杂UI交互的应用。本章的主要内容是包结构的介绍以及如何集成demo和运行demo。
包结构说明
包结构介绍
Foxit PDF SDK for Web提供了如下的两种包:
- Light package: FoxitPDFSDKForWeb_7_2_0.zip (不包含字体资源)
- Full package: FoxitPDFSDKForWeb_7_2_0_Full.zip (包含字体资源)
如果您已有字体资源或者只需使用在线字体,那么您可以选择light package。如果您不需要对字体库进行任何修改以及不介意包的大小,那么full package是您的首选。
下图显示了两种包中所包含的文件夹和文件。Light package和full package中含有的文件夹基本一样,除了full package包中的 “external” 文件夹以外。
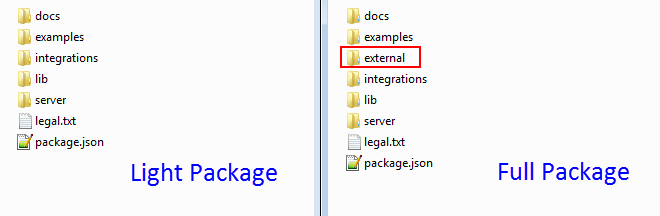
Package包含如下的文件夹和文件:
| docs: | 包含API手册,开发文档。 |
| examples: | 包含Foxit PDF SDK for Web的示例demo。 |
| external | 包含字体资源(只有full package包才有)。 |
| integrations | 包含将Foxit PDF SDK for Web集成到当前主流JavaScript框架的示例 (angular/react.js/vue.js框架的集成示例)。 |
| lib | 包含SDK核心库的源码包。 |
| server | 包含snapshot (截图功能)服务所需的http-server和Node.js脚本。 |
| legal.txt | 法律和版权信息。 |
| package.json | 项目描述文件。 |
“lib” 文件夹包括如下的文件:
| jr-engine | 前端渲染引擎。 |
| locales | 支持的国际化语言。不同语言的资源文件按名称放置在不同的目录下。 |
| PDFViewCtrl | PDFViewCtrl附加的plugin。 |
| stamps | Stamp模板。 |
| uix-addons | UIExtension附加的plugin。 |
| adaptive.js | 用于自适应设备(桌面端和手机端)的脚本文件。 |
| PDFViewCtrl.css | 带简单UI的SDK库对应的CSS文件。 |
| PDFViewCtrl.full.js | 带简单UI的SDK库。 |
| PDFViewCtrl.js | 无第三方库的PDFViewCtrl库。 |
| PDFViewCtrl.polyfills.js | PDFViewCtrl所依赖的脚本文件,用于兼容不同的浏览器。 |
| PDFViewCtrl.vendor.js | PDFViewCtrl所使用的第三方库 (列表见后文)。 |
| preload-jr-worker.js | 用于并行加载JR引擎资源以加快加载速度的脚本文件。 |
| UIExtension.css | 全功能交互UI对应的CSS文件。 |
| UIExtension.full.js | 全功能的SDK库。 |
| UIExtension.js | 无第三方库的UIExtension库。 |
| UIExtension.polyfills.js | UIExtension所依赖的脚本文件,用于兼容不同的浏览器。 |
| UIExtension.vendor.js | UIExtension所使用的第三方库 (列表见后文)。 |
| WebPDFJRWorker.js | Web Worker中运行的脚本,用来调用前端渲染引擎。 |
Package.json
Foxit PDF SDK for Web提供了一个package.json文件,用来帮助开发人员快速体验Web PDF,以及更轻松地将Web PDF集成到他们的项目中。package.json文件内容如下:
{
 "name": "foxit-pdf-sdk-for-web",
 "version": "7.2.0",
 "description": "Foxit pdf sdk for web.",
 "author": "Foxit Software Inc.",
 "main": "./lib/PDFViewCtrl.full.js",
 "scripts": {
 "start": "concurrently --kill-others \"npm run start-http-server\" \"npm run start-snapshot-server\"",
 "start-snapshot-server": "node ./server/snapshot/src/index -p 3002",
 "start-http-server": "node ./server/index"
 },
 "devDependencies": {
 "boxen": "^4.1.0",
 "chalk": "^2.4.1",
 "concurrently": "^4.1.0",
 "http-proxy-middleware": "^0.19.1",
 "koa": "^2.7.0",
 "koa-body": "^4.0.4",
 "koa-body-parser": "^1.1.2",
 "koa-router": "^7.4.0",
 "koa2-connect": "^1.0.2",
 "lru-cache": "^4.1.3",
 "raw-body": "^2.3.3",
 "require-dir": "^1.0.0",
 "serve-handler": "^6.0.2"
 },
 "serve": {
 "port": 8080,
 "public": "/",
 "proxy": {
 "target": "http://127.0.0.1:3002",
 "changeOrigin": true
 }
 }
}
Foxit PDF SDK for Web使用的第三方库
Foxit PDF SDK for Web提供了两种形式的JS包:包含第三方库的JS包和不包含第三方库的JS包。如果您的工程已经使用了相同的第三方库,那么您不需要再引入该库,以免重复引用。
对于 PDFViewCtrl.full.js 包:
PDFViewCtrl.full.js 带简单UI的SDK库
PDFViewCtrl.polyfills.js PDFViewCtrl所依赖的脚本文件,用于兼容不同的浏览器
PDFViewCtrl.vendor.js PDFViewCtrl所使用的第三方库 (列表见后文)
PDFViewCtrl.js 无第三方库的PDFViewCtrl库
因此,(PDFViewCtrl.polyfills.js + PDFViewCtrl.vendor.js + PDFViewCtrl.js) = PDFViewCtrl.full.js.
以下两种形式是等效的:
1. <script src=”../FoxitPDFSDKForWeb/lib/PDFViewCtrl.full.js”></script>
2. <script src=”../FoxitPDFSDKForWeb/lib/ PDFViewCtrl.polyfills.js”></script>
<script src=”../FoxitPDFSDKForWeb/lib/PDFViewCtrl.vendor.js”></script>
<script src=”../FoxitPDFSDKForWeb/lib/PDFViewCtrl.js”></script>
PDFViewCtrl.vendor.js 包含的第三方库如下所示:
jquery
i18next
i18next-chained-backend
i18next-localstorage-backend
i18next-xhr-backend
jquery-contextmenu
dialog-polyfill
hammerjs
eventemitter3
对于UIExtension.full.js包:
UIExtension.full.js 全功能的SDK库
UIExtension.polyfills.js UIExtension所依赖的脚本文件,用于兼容不同的浏览器
UIExtension.js 无第三方库的UIExtension库
UIExtension.vendor.js UIExtension所使用的第三方库 (列表见后文)
因此,(UIExtension.polyfills.js + UIExtension.vendor.js + UIExtension.js) = UIExtension.full.js.
以下两种形式是等效的:
1. <script src=”../FoxitPDFSDKForWeb/lib/UIExtension.full.js”></script>
2. <script src=”../FoxitPDFSDKForWeb/lib/UIExtension.polyfills.js”></script>
<script src=”../FoxitPDFSDKForWeb/lib/UIExtension.vendor.js”></script>
<script src=”../FoxitPDFSDKForWeb/lib/UIExtension.js”></script>
UIExtension.vendor.js包含的第三方库如下所示:
jquery
i18next
i18next-chained-backend
i18next-localstorage-backend
i18next-xhr-backend
dialog-polyfill
hammerjs
eventemitter3
spectrum-colorpicker
file-saver
集成
本节将介绍如何在您的项目工程中集成Foxit PDF SDK for Web。
作为全局变量集成
您可以将Foxit PDF SDK for Web作为全局变量集成到您的项目中:
<script src="./lib/PDFViewCtrl.full.js"></script>
 var PDFViewer = PDFViewCtrl.PDFViewer;
 var pdfViewer = new PDFViewer(…)
模块化集成
您可以通过模块化的方式将Foxit PDF SDK for Web集成到您的项目中。请参阅”examples/UIExtension/integrate-as-module/” 目录下的示例。
注册 License Key
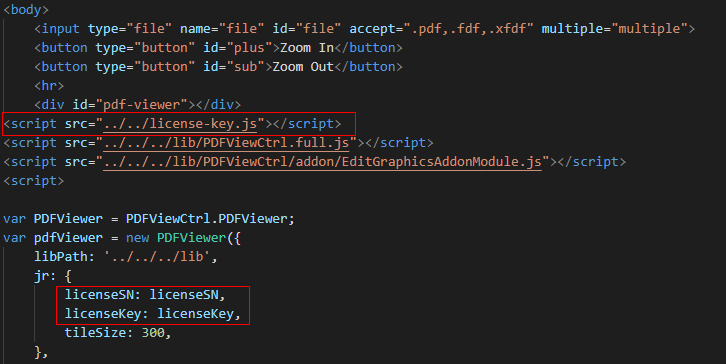
默认试用的license key在 “examples\license-key.js” 文件中,如下所示:

如果您需要使用正式授权的key激活Foxit PDF SDK for Web,请用从Foxit购买的授权key文件替换”examples\license-key.js” 文件中的”licenseSN” 和 “licenseKey” 的值。
在您的HTML入口文件中,注册license key,您需要进行如下的操作:
- 引用license-key.js 文件。
- 在构造函数中声明”licenseSN” 和 “licenseKey” 变量。
比如,您可以参考 “examples\PDFViewCtrl\basic_webViewer” 目录下的简单web viewer demo 的”index.html” 文件。注册license key的核心代码如下所示:
快速运行Foxit PDF SDK for Web Demo
运行Foxit PDF SDK for Web demo之前,您需要首先准备一台web服务器。在本指南中,我们将会介绍Foxit PDF SDK for Web包中的demo,以及会以Nginx和Node.js服务为例来介绍如何快速运行Foxit PDF SDK for Web demo。
Demo简介
“examples” 文件夹下提供了多种demo以便用户参考。在启动http服务后,您可以通过在浏览器中输入相应的地址来访问和体验demo。
- 高级web viewer demo
该demo集成了Foxit PDF SDK for Web提供的所有功能,使用了从视图到文档解析的全功能 “UIExtension.full.js”包 (在”lib” 文件夹下)。Demo的源码路径:”examples/UIExtension/advanced_webViewer/index.html”。
在浏览器中,通过如下的地址快速访问该demo:
http://localhost:{port}/examples/UIExtension/advanced_webViewer/index.html
- 简单web viewer demo
- 该demo阐述了如何调用Foxit PDF SDK for Web API 加载PDF文档,以及放大和缩小文档。该demo使用 “lib” 文件夹下的 “PDFViewCtrl.full.js”包。Demo的源码路径: http://localhost:{port}/examples/PDFViewCtrl/basic_webViewer/index.html
- 离线demo
该demo阐述了如何注册 “examples/PDFViewCtrl/service-worker” 文件夹下”service-worker.js”,以便在service worker支持的浏览器中更好的缓存核心依赖文件”gsdk.js” 和字体文件,以加快文件二次打开的速度以及用于离线模式。Demo的源码路径:”examples/PDFViewCtrl/service-worker/cache.html “。
在浏览器中,通过如下的地址快速访问该demo:
http://localhost:{port}/examples/PDFViewCtrl/service-worker/cache.html
- 内嵌DIV应用demo
该demo将Foxit PDF SDK for Web的simple UI渲染到指定大小的div容器内。Demo的源码路径:”examples/PDFViewCtrl/div/index.html”。
在浏览器中,通过如下的地址快速访问该demo:
http://localhost:{port}/examples/PDFViewCtrl/div/index.html。
使用Nginx 运行demo示例
以Windows为例,假设您系统已经安装Nginx。当您运行Nginx服务时,您可以直接修改conf 目录下的’nginx.conf’。在本示例中,我们直接编写一个配置文件来运行Foxit PDF SDK for Web Demo。请按照如下的步骤操作:
- 下载 FoxitPDFSDKForWeb_7_2_0.zip.
- 将下载的包解压到一个新的目录,比如解压到 ‘D:/’ 下的 “FoxitPDFSDKForWeb”。
- 创建一个Nginx配置文件。比如,在 ‘D:/FoxitPDFSDKForWeb’ 下创建一个’webpdf.conf’ 文件。
- 设置和配置虚拟服务器。以下是一个配置示例。其中 ‘D:/FoxitPDFSDKForWeb/’ 是SDK所在的路径。
server {
 listen 8080;
 server_name 127.0.0.1;

location / {
 alias "D:/FoxitPDFSDKForWeb/";
 charset utf8;
 index index.html;
 }
 }
- 定位到Nginx的安装路径,在conf 目录下找到 ‘nginx.conf’,使用include指令来引用新配置文件中的内容。
include D:/FoxitPDFSDKForWeb/webpdf.conf;
- 为了使配置文件中的设置生效,您需要重启Nginx服务,或者使用 ‘nginx -s reload’ 命令升级配置而且不需要中断当前请求的处理。
- 在浏览器中访问demo。
对于高级web viewer demo,请访问如下的地址:
http://127.0.0.1:8080/examples/UIExtension/advanced_webViewer/index.html.
对于简单web viewer demo,请访问如下的地址:
http://127.0.0.1:8080/examples/PDFViewCtrl/basic_webViewer/index.html.
备注:您可以按照如上的配置运行demo,但是此时截图(snapshot)功能是不能正常使用的。snapshot的图片不能被缓存到剪贴板,因此您不能根据需要将其粘贴到指定的位置。在这种情况下,请按照如下的步骤建立snapshot服务:
- 安装node.js 9.0或以上版本,如果已经安装,请跳过此步。
- 在命令行中,导航到根目录 (“D:/FoxitPDFSDKForWeb”),输入”npm install” 安装相关需要的依赖项,然后输入”npm run start-snapshot-server” 开启snapshot 服务 (默认端口是3002)。
备注:如果您需要指定snapshot 服务的端口,您可以在Foxit PDF SDK for Web包中的”server/snapshot/package.json“文件中进行修改。找到默认端口3002,如下所示,然后根据您的需要对其进行修改:
"start": "node src/index -p 3002"
- 在 ‘D:/FoxitPDFSDKForWeb’ 文件夹下的 ‘webpdf.conf’ 文件中配置Nginx 反向代理。
server {
 listen 8080;
 server_name 127.0.0.1;

location / {
 alias "D:/FoxitPDFSDKForWeb/";
 charset utf8;
 index index.html;
 }

location ~ ^/snapshot/(.+)$ {
 proxy_pass http://127.0.0.1:3002/snapshot/$1$is_args$args;
 proxy_redirect off;

proxy_request_buffering on;

proxy_set_header Host $host;
 proxy_set_header X-Real-IP $remote_addr;
 proxy_set_header X-Forwarded-For $proxy_add_x_forwarded_for;
 }
 }
- 重启Nginx 服务,然后刷新您的浏览器,则snapshot功能就可以正常使用了。
使用Node.js 运行demo示例
假设您的系统已经安装Node.js 9.0 或者更高版本。请按照如下的步骤运行Foxit PDF SDK for Web demo:
- 下载FoxitPDFSDKForWeb_7_2_0.zip。
- 将下载的包解压到一个新的目录,比如解压到 ‘D:/’ 下的 “FoxitPDFSDKForWeb”。
- 在命令行中,导航到上述解压的目录 (“D:/FoxitPDFSDKForWeb”),输入”npm install” 安装相关需要的依赖项,然后输入”npm start” 开启http-server。
- 在浏览器中访问demo。
对于高级web viewer demo,请访问如下的地址:
http://127.0.0.1:8080/examples/UIExtension/advanced_webViewer/index.html.
对于简单web viewer demo,请访问如下的地址:
http://127.0.0.1:8080/examples/PDFViewCtrl/basic_webViewer/index.html.
备注:使用这种方法,您不需要配置代理,snapshot功能就可以正常使用。如果您需要指定http-server 和 snapshot服务的端口,您可以在Foxit PDF SDK for Web包中的 “package.json” 文件中进行端口修改。
修改http-server端口,定位到默认端口8080,如下所示,然后根据您的需要进行修改:
 "serve": {
 "port": 8080,
 "public": "/",
 "proxy": {
 "target": "http://127.0.0.1:3002",
 "changeOrigin": true
 }
 }
修改snapshot服务端口,定位到默认端口3002,如下所示,然后根据您的需要进行修改:(有两处需要修改)
"start-snapshot-server": "node ./server/snapshot/src/index -p 3002",
"serve": {
 "port": 8080,
 "public": "/",
 "proxy": {
 "target": "http://127.0.0.1:3002",
 "changeOrigin": true
 }
 }
构建一个Web PDF工程
本章将提供详细的教程来帮助您快速开始使用Foxit PDF SDK for Web构建一个简单的PDF阅读器和一个功能齐全的PDF阅读器。
前期准备工作
创建一个新的Web工程
- 创建一个新的目录作为工程目录,比如 “D:/test_web”。
- 将Foxit PDF SDK for Web 包下的 “lib“, “server” 和 “external” (如果您需要使用字体资源) 文件夹,以及 “package.json” 文件拷贝到”D:/test_web”。
- 拷贝一个PDF文件到 “D:/test_web”,比如 “docs” 文件夹下的demo手册。
- 在 “D:/test_web” 文件夹下创建一个html 文件 (index.html)。则test_web目录如下所示:
test_web
 +-- lib (copy from the Foxit PDF SDK for Web package)
 +-- server (copy from the Foxit PDF SDK for Web package)
 +-- package.json (copy from the Foxit PDF SDK for Web package)
 +-- index.html
index.html的内容如下所示:
<html>
<head>
 <meta charset="utf-8">
 <style>
 .fv__ui-tab-nav li span {
 color: #636363;
 }
 .flex-row {
 display: flex;
 flex-direction: row;
 }
 </style>
 <!-- ignore other unimportant code -->
</head>
<body>
</body>
</html>
启动Http-Server
您可以参考2.3.2小节 “使用Nginx运行demo示例” 或者2.3.3小节 “使用Node.js运行demo示例” 来启动http-server。在本工程中,我们使用默认的端口号8080。
然后,在浏览器中访问http://127.0.0.1:8080/index.html,您将会看到一个空白的页面,即说明准备工作已经完成。
使用PDFViewCtrl集成简单web viewer demo
本节主要介绍如何在上述创建的工程中使用PDFViewCtrl集成简单web viewer demo。请按照如下的步骤:
- 添加 /lib/PDFViewCtrl.css 样式到HTML页面的<head> 标签下:
<link rel="stylesheet" type="text/css" href="./lib/PDFViewCtrl.css">
- 导入”lib” 文件夹下的 “PDFViewCtrl.full.js” 库:
<script src="./lib/PDFViewCtrl.full.js"></script>
- 在HTML的<body> 标签下,添加 <div> 作为web viewer容器:
<div id="pdf-viewer"></div>
- 初始化Foxit PDF SDK for Web:
<script>
 var licenseSN = "Your license SN";
 var licenseKey = "Your license Key";
</script>
<script>
 var PDFViewer = PDFViewCtrl.PDFViewer;
 var pdfViewer = new PDFViewer({
 libPath: './lib', // the library path of Web SDK.
 jr: {
 licenseSN: licenseSN,
 licenseKey: licenseKey,
 }
 });
 pdfViewer.init('#pdf-viewer'); // the div (id="pdf-viewer")
<script>
备注:在Foxit PDF SDK for Web包下的 “example/license-key.js” 文件中可获取licenseSN 和 licenseKey的试用值。
- 打开一个PDF文档:
// modify the file path as your need.
fetch('/FoxitPDFSDKforWeb_DemoGuide.pdf').then(function(response) {
 response.arrayBuffer().then(function(buffer) {
 pdfViewer.openPDFByFile(buffer);
 })
})
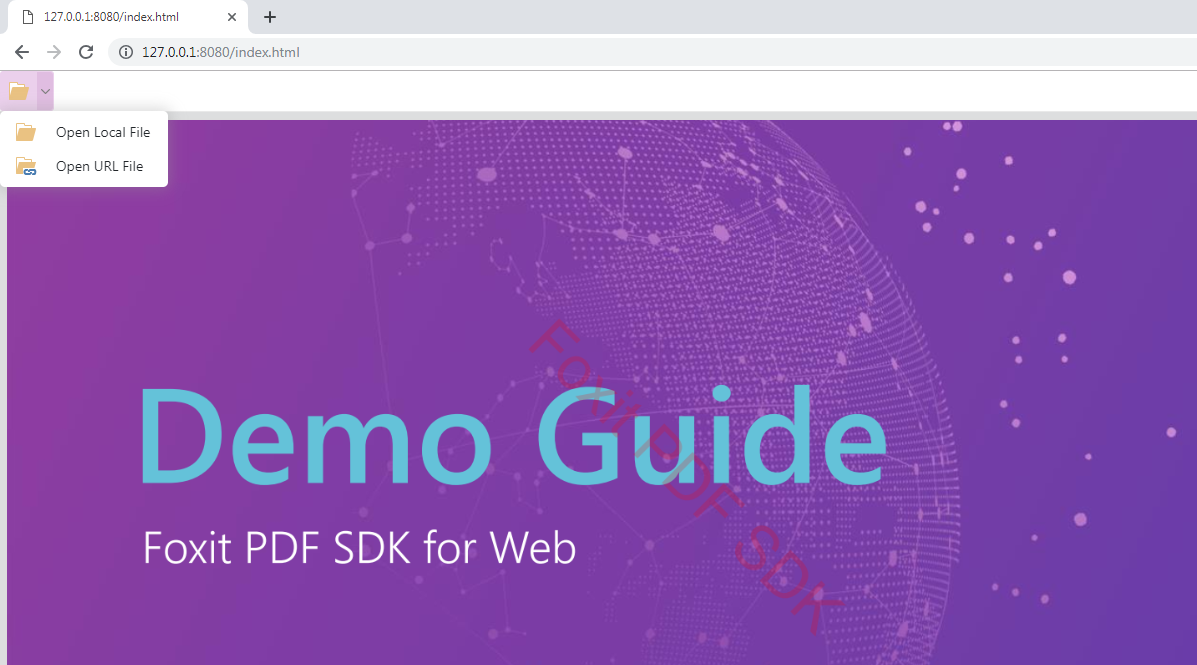
- 以上是使用PDFViewCtrl将简单 web viewer demo集成到您创建的工程中的主要步骤。当完成后,刷新浏览器(http://127.0.0.1:8080/index.html),然后您可以看到demo手册将显示如下:
 此时,它就是一个简单的web PDF viewer了。您可以通过右键点击页面的任何地方,然后选择放大或缩小选项来对PDF文档进行放大/缩小。
index.html的内容如下所示:
<html>
<head>
<meta charset="utf-8">
<link rel="stylesheet" type="text/css" href="./lib/PDFViewCtrl.css">

<!-- You can delete the following style because it doesn't work in this project -->
 <style>
 .fv__ui-tab-nav li span {
 color: #636363;
 }
 .flex-row {
 display: flex;
 flex-direction: row;
 }
</style>
 <!-- ignore other unimportant code -->
</head>
<body>
 <div id="pdf-viewer"></div>
 <script src="./lib/PDFViewCtrl.full.js"></script>
 <script>
 var licenseSN = "Your license SN";
 var licenseKey = "Your license Key";
 </script>
 <script>
 var PDFViewer = PDFViewCtrl.PDFViewer;
 var pdfViewer = new PDFViewer({
 libPath: './lib', // the library path of Web SDK.
 jr: {
 licenseSN: licenseSN,
 licenseKey: licenseKey,
 }
 });
 pdfViewer.init('#pdf-viewer'); // the div (id="pdf-viewer")

// modify the file path as your need.
 fetch('/FoxitPDFSDKforWeb_DemoGuide.pdf').then(function (response) {
 response.arrayBuffer().then(function (buffer) {
 pdfViewer.openPDFByFile(buffer);
 })
 })

</script>
</body>
</html>
使用UIExtension集成高级web viewer demo
上一节介绍了如何使用PDFViewCtrl集成简单web viewer demo。本节将在3.3.1小节创建的工程的基础上,介绍如何使用UIExtension集成高级web viewer demo。请按照如下的步骤:
- 添加 /lib/UIExtension.css样式到HTML页面的<head> 标签下:
<link rel="stylesheet" type="text/css" href="./lib/UIExtension.css">
- 导入”lib” 文件夹下的 “UIExtension.full.js” 库:
<script src="./lib/UIExtension.full.js"></script>
- 在HTML的<body> 标签下,添加 <div> 作为web viewer容器:
<div id="pdf-ui"></div>
- 初始化Foxit PDF SDK for Web:
<script>
 var licenseSN = "Your license SN";
 var licenseKey = "Your license Key";
</script>
<script>
 var pdfui = new UIExtension.PDFUI({
 viewerOptions: {
 libPath: './lib', // the library path of web sdk.
 jr: {
 licenseSN: licenseSN,
 licenseKey: licenseKey
 }
 },
 renderTo: '#pdf-ui' // the div (id="pdf-ui").
 });
<script>
备注:在Foxit PDF SDK for Web包下的 “example/license-key.js” 文件中可获取licenseSN 和 licenseKey的试用值。
- 打开一个PDF文档:
// modify the file path as your need.
 fetch('/FoxitPDFSDKforWeb_DemoGuide.pdf').then(function(response) {
 response.arrayBuffer().then(function(buffer) {
 pdfui.openPDFByFile(buffer);
 })
 })
- 以上是使用UIExtension将功能齐全的PDF viewer demo集成到您创建的工程中的主要步骤。当完成后,刷新浏览器(http://127.0.0.1:8080/index.html),然后您可以看到demo手册将显示如下:

此时,它就是一个功能齐全的web PDF viewer了。您可以根据需要浏览/编辑/注释/保护PDF文档。
<html>
<head>
 <meta charset="utf-8">
 <link rel="stylesheet" type="text/css" href="./lib/UIExtension.css">
 <style>
 .fv__ui-tab-nav li span {
 color: #636363;
 }
 .flex-row {
 display: flex;
 flex-direction: row;
 }
 </style>
 <!-- ignore other unimportant code -->
</head>
<body>
 <div id="pdf-ui"></div>
 <script src="./lib/UIExtension.full.js"></script>
 <script>
 var licenseSN = "Your license SN";
 var licenseKey = "Your license Key";
 </script>
 <script>
 var pdfui = new UIExtension.PDFUI({
 viewerOptions: {
 libPath: './lib', // the library path of web sdk.
 jr: {
 licenseSN: licenseSN,
 licenseKey: licenseKey
 }
 },
 renderTo: '#pdf-ui' // the div (id="pdf-ui").
 });

// modify the file path as your need.
 fetch('/FoxitPDFSDKforWeb_DemoGuide.pdf').then(function (response) {
 response.arrayBuffer().then(function (buffer) {
 pdfui.openPDFByFile(buffer);
 })
 })

</script>
</body>
</html>
集成UIExtension的add-ons
Foxit PDF SDK for Web在UIExtension的基础上提供了一些扩展的功能,比如文件属性、多媒体、密码保护、密文保护、PDF path对象、打印、全屏模式设置、导入/导出表单、撤销(undo)/还原(redo) (快捷键:撤销(Ctrl+Z),还原(Ctrl+Y))、水平连续模式设置以及文本对象(仅支持桌面端)。如果您需要集成这些扩展功能,请添加如下的代码片段:
 addons: [
 './lib/uix-addons/file-property',
 './lib/uix-addons/multi-media',
 './lib/uix-addons/password-protect',
 './lib/uix-addons/redaction',
 './lib/uix-addons/path-objects',
 './lib/uix-addons/print',
 './lib/uix-addons/full-screen',
 './lib/uix-addons/import-form',
 './lib/uix-addons/export-form',
 './lib/uix-addons/undo-redo',
 './lib/uix-addons/h-continuous'
 ].concat(UIExtension.PDFViewCtrl.DeviceInfo.isMobile ? [] : './lib/uix-addons/text-object')
基于3.3小节 使用UIExtension集成高级web viewer demo的工程上,更新index.html,如下所示:
<html>
<head>
 <meta charset="utf-8">
 <link rel="stylesheet" type="text/css" href="./lib/UIExtension.css">
 <style>
 .fv__ui-tab-nav li span {
 color: #636363;
 }
 .flex-row {
 display: flex;
 flex-direction: row;
 }
 </style>
 <!-- ignore other unimportant code -->
</head>
<body>
 <div id="pdf-ui"></div>
 <script src="./lib/UIExtension.full.js"></script>
 <script>
 var licenseSN = "Your license SN";
 var licenseKey = "Your license Key";
 </script>
 <script>
 var pdfui = new UIExtension.PDFUI({
 viewerOptions: {
 libPath: './lib', // the library path of web sdk.
 jr: {
 licenseSN: licenseSN,
 licenseKey: licenseKey
 }
 },
 renderTo: '#pdf-ui', // the div (id="pdf-ui").

 addons: [
 './lib/uix-addons/file-property', // should use the relative path.
 './lib/uix-addons/multi-media',
 './lib/uix-addons/password-protect',
 './lib/uix-addons/redaction',
 './lib/uix-addons/path-objects',
 './lib/uix-addons/print',
 './lib/uix-addons/full-screen',
 './lib/uix-addons/import-form',
 './lib/uix-addons/export-form',
 './lib/uix-addons/undo-redo',
 './lib/uix-addons/h-continuous'
 ].concat(UIExtension.PDFViewCtrl.DeviceInfo.isMobile ? [] : './lib/uix-addons/text-object')

 });

 // modify the file path as your need.
 fetch('/FoxitPDFSDKforWeb_DemoGuide.pdf').then(function (response) {
 response.arrayBuffer().then(function (buffer) {
 pdfui.openPDFByFile(buffer);
 })
 })

 </script>
</body>
</html>
刷新浏览器 (http://127.0.0.1:8080/index.html),然后您可以看到带有扩展功能的web PDF viewer。比如,在Home选项卡下,已经集成了文件属性、打印和导入/导出表单功能,如下所示:

使项目自适应桌面端和移动端
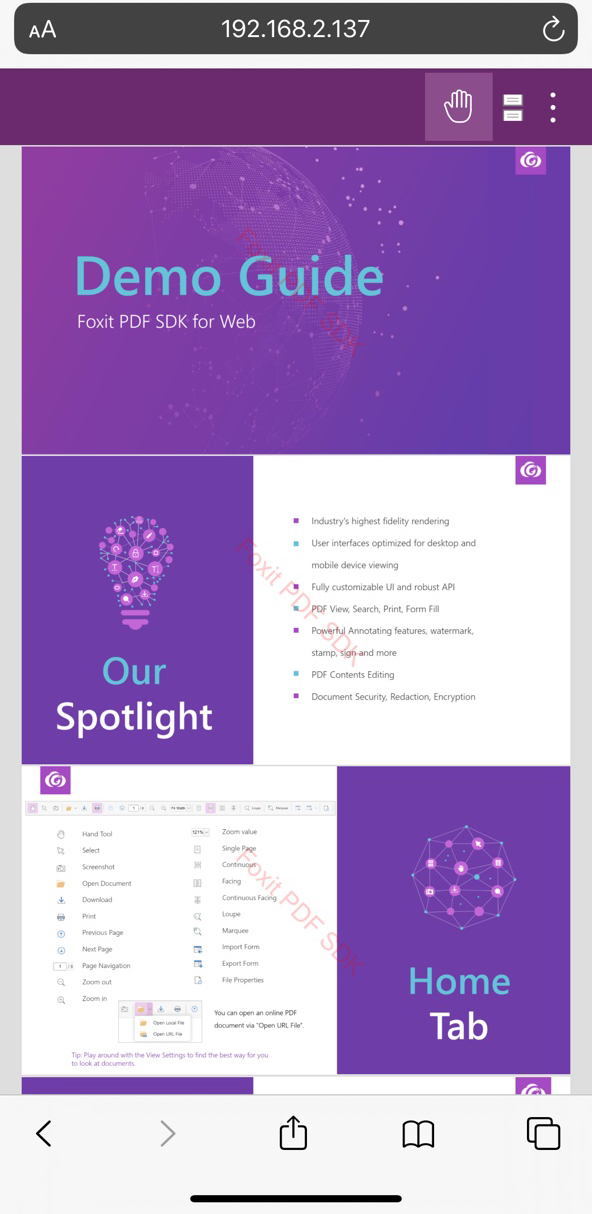
Foxit PDF SDK for Web能够使项目自适应设备 (桌面端和移动端)。如果在桌面端浏览器中访问项目,则其会显示桌面端UI布局;如果在移动端浏览器中访问项目,则其会显示移动端UI布局。请参考 “examples\UIExtension\custom_appearance” 目录下的完整demo示例 (adaptive-to-the-device.html) 使项目自适应桌面端和移动端。
比如,假设您电脑的IP地址是192.168.2.137,在移动端浏览器中访问 adaptive-to-the-device.html demo (http://192.168.2.137:8080/examples/UIExtension/custom_appearance/adaptive-to-the-device.html),则您会看到如下所示的移动端PDF viewer:
并行加载JR引擎资源来提高加载速度
从7.1.1版本开始,Foxit PDF SDK for web在 “lib” 目录下提供了一个脚本文件 “preload-jr-worker.js”,该脚本文件是web SDK在后台执行任务的worker线程。它提前加载JR引擎资源,获取潜在加载性能优势,节省初始化的时候。并且它可以与SDK JS库同时运行,在不同的线程中初始化数据。在HTML index文件中设置 “preload-jr-worker.js” 的核心代码示例如下所示:
 <body>
    <div id="pdf-ui"></div>
    <script>
 var licenseSN = "Your license SN";
 var licenseKey = "Your license Key";
    </script>

    <!-- Add the preload-jr-worker.js-->
    <script src="./lib/preload-jr-worker.js"></script>
    <script>
        var readyWorker = preloadJrWorker({
            workerPath: './lib/',
            enginePath: './lib/jr-engine/gsdk',
            fontPath: './external/brotli',
            licenseSN: licenseSN,
            licenseKey: licenseKey
        })
    </script>

    <script src="./lib/UIExtension.full.js"></script>
    <script>

        var pdfui = new UIExtension.PDFUI({
            viewerOptions: {
                libPath: './lib', // the library path of web sdk.
                jr: {
                    readyWorker: readyWorker,
                }
            },
            renderTo: '#pdf-ui', // the div (id="pdf-ui").
            appearance: UIExtension.appearances.adaptive,
            addons: [
                '```'
            ]
        });
        ...
自定义UI
从7.0版本开始,Foxit PDF SDK for Web提供了包含功能模块的内置UI框架,该UI框架是通过使用Foxit PDF SDK for Web来实现的,并且封装在UIExtension.js中。此外,自定义UI也非常简单。Foxit PDF SDK for Web为开发人员提供了一组丰富的API,用来自定义web viewer的外观和风格。
UIExtension 的界面由两部分组成:template 和 fragments。Template相当于是对HTML的扩展,在模板中的控件需要通过标签来声明。Template用来自定义无需交互的UI布局 (css样式,图标,文本等) 。Fragments是一组UI snippet,用来自定义模板中的控件的配置项和交互逻辑。每一个snippet都有一个操作类型 “aciton”,其用来指定snippet的作用方式 (append, prepend, before, after, ext, replace, insert, 和 remove,默认是 ext)。通过这些作用方式,您可以向template中插入、删除、替换和修改控件。
下面示例中所用到的所有内置控件,请参阅4.4小节 “内置组件简介“.
使用template自定义UI布局
Template主要用来自定义控件的UI布局。以下示例将介绍template的使用方法。所有的示例代码都是基于3.3小节的 使用UIExtension集成高级web viewer demo工程。
创建一个简单的template
一个最简单的模板,如下所示:
var pdfui = new UIExtension.PDFUI({
 viewerOptions: {
 libPath: './lib', // the library path of web sdk.
 jr: {
 licenseSN: licenseSN,
 licenseKey: licenseKey
 }
 },
 renderTo: '#pdf-ui', // the div (id="pdf-ui").
 template: [
 '<webpdf>',
 ' <viewer></viewer>',
 '</webpdf>'
 ].join('')
});
- <webpdf> 标签会监听文档打开和关闭事件,触发Appearance对象的enableAll和disableAll方法来启用/禁用界面上相关的组件。
- <viewer> 标签是用于渲染PDF内容的地方。每个template都必须含有一个<viewer> 标签。该标签可以放置在任何位置,请参考后面的示例代码。
刷新浏览器 (http://127.0.0.1:8080/index.html),然后您可以看到一个简单的web PDF viewer,如下所示:

添加一个工具栏
使用<toolbar>标签添加一个新的工具栏按钮。
 var pdfui = new UIExtension.PDFUI({
 viewerOptions: {
 libPath: './lib', // the library path of web sdk.
 jr: {
 licenseSN: licenseSN,
 licenseKey: licenseKey
 }
 },
 renderTo: '#pdf-ui', // the div (id="pdf-ui").
 template: [
 '<webpdf>',
 ' <toolbar>',
 ' <open-file-dropdown></open-file-dropdown>',
 ' </toolbar>',
 ' <viewer></viewer>',
 '</webpdf>'
 ].join('')
 });
刷新浏览器 (http://127.0.0.1:8080/index.html),然后您可以看到新加的工具栏按钮,如下所示:
添加一个标签页
使用<tabs> 和 <tab>标签来添加一个新的标签页。
var pdfui = new UIExtension.PDFUI({
 viewerOptions: {
 libPath: './lib', // the library path of web sdk.
 jr: {
 licenseSN: licenseSN,
 licenseKey: licenseKey
 }
 },
 renderTo: '#pdf-ui', // the div (id="pdf-ui").
 template: [
'<webpdf>',
' <toolbar>',
' <tabs>',
' <tab title="Home">',
' <open-file-dropdown></open-file-dropdown>',
' </tab>',
' <tab title="Comment">',
' <div class="flex-row">',
' <create-strikeout-button></create-strikeout-button>',
' <create-underline-button></create-underline-button>',
' <create-squiggly-button></create-squiggly-button>',
' <create-replace-button></create-replace-button>',
' <create-caret-button></create-caret-button>',
' <create-note-button></create-note-button>',
' </div>',
' </tab>',
' </tabs>',
' </toolbar>',
' <viewer></viewer>',
'</webpdf>'
].join('')
});
刷新浏览器 (http://127.0.0.1:8080/index.html),然后您可以看到新添加的标签页,如下所示:
添加一个侧边栏
使用<sidebar>标签来添加一个新的侧边栏按钮。
var pdfui = new UIExtension.PDFUI({
 viewerOptions: {
 libPath: './lib', // the library path of web sdk.
 jr: {
 licenseSN: licenseSN,
 licenseKey: licenseKey
 }
 },
 renderTo: '#pdf-ui', // the div (id="pdf-ui").
 template: [
'<webpdf>',
' <toolbar>',
' <tabs>',
' <tab title="Home">',
' <open-file-dropdown></open-file-dropdown>',
' </tab>',
' <tab title="Comment">',
' <div class="flex-row">',
' <create-strikeout-button></create-strikeout-button>',
' <create-underline-button></create-underline-button>',
' <create-squiggly-button></create-squiggly-button>',
' <create-replace-button></create-replace-button>',
' <create-caret-button></create-caret-button>',
' <create-note-button></create-note-button>',
' </div>',
' </tab>',
' </tabs>',
' </toolbar>',
' <div class="flex-row">',
' <sidebar>',
' <bookmark-sidebar-panel></bookmark-sidebar-panel>',
' </sidebar>',
' <viewer></viewer>',
' </div>',
'</webpdf>'
].join('')

});
刷新浏览器 (http://127.0.0.1:8080/index.html),然后您可以看到新添加的书签侧边栏,如下所示:

内置布局模板
内置布局模板位于”examples\UIExtension\layout_templates” 目录下。桌面端请参考built-in-pc-layout-template.tpl 文件,移动端请参考built-in-mobile-layout-template.tpl文件。您可以根据需要直接修改模板来自定义UI。
在 “examples\UIExtension\custom_appearance” 目录下,Foxit PDF SDK for Web 提供了两个自定义模板示例。”adaptive-to-the-device.html” 能自适应设备 (桌面端和移动端),”not-adaptive-to-the-device.html” 不能自适应设备,仅支持桌面端布局。
使用fragments自定义UI
Fragments是一组UI snippet,用来自定义模板中的控件的配置项和交互逻辑。
创建一个下拉菜单
下面的示例代码创建一个包含两个drop-down按钮的下拉菜单, 然后将其加入到 “home-tab-group-hand” 组件的子组件列表的末尾。
如何获取目标组件的名称 (只针对widget部件),您可以在浏览器中右键点击该组件,选择 “审查”, 然后在对应的 <a> 标签中找到 “component-name” 属性的值。对于容器组件,比如”target: ‘home-tab-group-hand‘,”,您可以在浏览器中右键点击其中一个子组件,选择 “审查”,然后在相关的<div> 标签中找到 “component-name” 属性的值。
 function CustomController() {
 UIExtension.Controller.apply(this, arguments);
 }
 CustomController.prototype = Object.create(UIExtension.Controller.prototype, {
 constructor: {
 value: CustomController
 }
 });
 Object.assign(CustomController.prototype, {
 mounted: function () {
 console.info(this.component, 'mounted');
 },
 handle: function (selectedFile) {
 alert(selectedFile.name);
 }
 });

var pdfui = new UIExtension.PDFUI({
 viewerOptions: {
 libPath: './lib', // the library path of web sdk.
 jr: {
 licenseSN: licenseSN,
 licenseKey: licenseKey
 }
 },
 renderTo: '#pdf-ui', // the div (id="pdf-ui").

fragments: [{
 // Add a component to the end of the list of children of a specified target component.
 action: UIExtension.UIConsts.FRAGMENT_ACTION.APPEND,
 // Specify the name of the target component that the new components defined in the above template will be appended to. All the target names of fragments are defined in the layout template.
 target: 'home-tab-group-hand',
 // Define the properties of the added component, such as icon, text, and css style.
 template: [
 '',
 ' say hello',
 ' open',
 ''
 ].join(''),
 // Define the interaction logic of the added component.
 config: [{
 // specify the component in the above template that the configuration will be applied to.
 // For example, the configuration will be applied to the component with the name of "show-hello-button".
 target: 'show-hello-button',
 callback: function () {
 alert('hello');
 }
 },
 {
 // The configuration will be applied to the component with the name of "select-pdf-file-button" which is defined in the above template of fragments.
 target: 'select-pdf-file-button',
 // Extend Controller, and implement the handle function.
 callback: CustomController
 }]
 }]
 });
刷新浏览器 (http://127.0.0.1:8080/index.html),然后您可以看到新添加的下拉菜单,如下所示:
删除已有工具栏按钮
通过fragment删除一个工具栏按钮是非常简单的。比如,删除手型工具  ,您只需要向fragment中添加一个新的对象。基于4.2.1小节的示例,添加如下的代码:
 {
 target: 'hand-tool',
 action: UIExtension.UIConsts.FRAGMENT_ACTION.REMOVE
 }
刷新浏览器 (http://127.0.0.1:8080/index.html),然后您可以看到手型工具已被移除,如下所示:

修改已有工具栏按钮
通过fragment修改一个工具栏按钮也是非常简单的。类似删除已有工具栏控件章节,您只需要向fragment中添加一个新的对象。
修改按钮的图标
例如,修改手型工具  的图标,只需要在基于4.2.1小节的示例上添加如下的代码:
 {
 target: 'hand-tool',
 config: {
 iconCls: 'fv__icon-toolbar-note' // your custom icon.
 }
 }
刷新浏览器 (http://127.0.0.1:8080/index.html),然后您可以看到手型工具的图标已被修改,如下所示:
修改按钮的工具提示信息
例如,修改手型工具  的工具提示信息,只需要在基于4.2.1小节的示例上添加如下的代码:
 {
 target: 'hand-tool',
 config: {
 tooltip: {
 title: 'your custom tooltip'
 }
 }
 }
刷新浏览器 (http://127.0.0.1:8080/index.html),然后您可以看到手型工具的工具提示信息已被修改为 “your custom tooltip”,如下所示:

修改按钮的事件
有两种方法用来修改按钮的事件:
- 覆盖内置的事件。比如:
{
 target: 'hand-tool',
 config: {
 callback: function() {
 alert('your click event handler');
 }
 }
 }
- 基于原有内置事件的逻辑基础上,添加自定义行为。可以使用如下的方式进行配置:
{
 target: 'hand-tool',
 config: {
 callback: {
 before: function (handleMethodArguments ) {
 console.info('called before handle callback with arguments: ', handleMethodArguments);
 },
 after: function (value, handleMethodArguments ) {
 console.info('called after handle callback with returning value and arguments: ', value, handleMethodArguments);
 }
 }
 }
 }
其它示例
有关更多示例代码,请参阅 “examples\UIExtension\fragment_usage” 目录下的示例。
模块化
为了区分内置组件和用户自定义组件以避免冲突,UIExtension提供了模块化功能,可以将组件分别注册在不同的模块中。然后,在template中声明组件时加上模块名前缀。
创建自定义模块
如果您需要定义和使用和内置组件同名的自定义组件,您可以首先创建一个自定义模块,然后在该模块中注册自定义组件。
例如,在内置组件中已经存在一个名为”dropdown“的组件,如果您需要定义一个同名的自定义组件,您可以参考以下的示例:
创建一个新的模块”my-widgets”,然后在该模块中注册一个自定义组件:
 // Create a new module. Please note that the second parameter must be an array if you create a new module.
 var module = UIExtension.modular.module('my-widgets', []);

function UserDefinedDropdownComponent() {
 UIExtension.Component.apply(this, arguments);
 }
 UserDefinedDropdownComponent.getName = function() {
 return 'dropdown'; // Declare the tag name of the component. There is already an existing component with the same name of 'dropdown' in the built-in component.
 }
 UserDefinedDropdownComponent.prototype.constructor = UIExtension.Component;
 UserDefinedDropdownComponent.prototype.render = function() {
 UIExtension.Component.prototype.render.call(this);
 this.element.innerText = 'User-defined dropdown component';
 }
 module.registerComponent(UserDefinedDropdownComponent);
然后,内置dropdown组件和自定义dropdown组件可以使用如下的方式进行区别:
<!-- built-in dropdown -->
<dropdown></dropdown>
<!-- user-defined dropdown -->
<my-widgets:dropdown></my-widgets:dropdown>
例如,使用自定义dropdown组件:
 var pdfui = new UIExtension.PDFUI({
 // Omit other parameters.
 fragments: [{
 action: UIExtension.UIConsts.FRAGMENT_ACTION.APPEND,
 target: 'home-tab-group-hand',
 template: '' // use a colon to separate the module name and component name in the template.
 }]
 });
内置组件简介
简单来说,定义在template中的一个标签就是一个组件。容器和部件都属于组件中的一种。区别是容器可以容纳子组件,而部件不可以。所有原生的HTML标签都被定义成容器组件,因此可以自由进行嵌套。
Foxit PDF SDK for Web 封装了一组丰富的内置组件以便开发人员可以快速构建一个web viewer,以及根据需要进行自定义。本章将列举和介绍内置组件中的基础组件和业务组件。
基础组件
| 类型 | 名称 | 描述 |
|---|---|---|
| 容器 | toolbar | 工具栏组件,相当于一个空的div (带有底部边框)。 |
| tabs | 标签组件,是tab组件的父组件,用来管理标签页。
备注:Tab必须作为tabs组件的子组件存在。 |
|
| tab | 标签页。 | |
| group-list | 分组列表,用来管理group组件。 | |
| group | 分组组件,必须作为group-list的子组件存在。 | |
| sidebar | 侧边栏,用来管理侧边栏面板。 | |
| sidebar-panel | 侧边栏面板,可以指定面板的图标、标题和内容。例如,demo页面中的sidebar-search, 和 sidebar-bookmark。 | |
| layer | 浮动框组件,支持灰色背景和模态框,可以用来实现对话框。 | |
| layer-header | 用于对话框头部的组件,可以设置标题,并且带有一个关闭按钮。 | |
| layer-toolbar | 相当于一个高度1.5em以及自带flex布局的div,通常用于存放按钮等部件。 | |
| layer-view | 相当于一个带有fv_ui-layer-panel的div,通常用于存放对话框的内容。 | |
| dropdown | 下拉组件。 | |
| dropdown-item | 下拉选项。 | |
| contextmenu | 右键菜单组件。其子组件必须是contextmenu-item 和 contextmenu-separator。显示右键菜单组件,您需要调用showAt方法。 | |
| 部件 | dropdown-button | 下拉选项的一种。点击后触发Controller的handle方法以及click事件。如果设置为文件选择器模式,则点击选择文件后触发change事件,同时会将选中的文件对象传给Controller的handle方法。 |
| 容器 | accordion | 手风琴组件。 |
| accordion-card | 手风琴组件的卡片。可以设置带有标题,内容可以被收缩。其必须以accordion的子组件存在。 | |
| webpdf | 默认template的根组件。其会监听pdfviewer对象的文档打开和关闭事件,以及根据文档的状态控制所有组件的禁用/启用。 | |
| 部件 | viewer | 渲染PDF文件的组件。每个template文件都必须配置一个viewer组件。 |
| text | 其会被解析成DOM树中的Text节点。Text部件中的内容会被i18next库本地化。 | |
| xbutton | 按钮组件。支持设置图标和文本。点击后会触发click事件以调用Controller的handle方法。 | |
| file-selector | 文件选择组件,支持设置图标和文本。点击后会打开系统文本选择器,选择文件后会触发change事件,以及调用Controller的handle方法并传入选中的文件对象。 | |
| number | 数字输入框,可以设置数字范围和步长。默认范围是无限,默认没有步长。设置步长后,如果最小值不等于无穷小的情况下,输入框的值就一定是最小值+步长*整数。 | |
| contextmenu-item | 右键菜单选项,必须是contextmenu的子组件。其配置和使用方法都与xbutton类似。 | |
| contextmenu-separator | 右键菜单分隔线。没有其他特殊的作用。 | |
| 插槽 | slot | 插槽可以用来实现在复杂的容器组件的不同位置插入子组件的需求。
备注:如果 “for=”slotName”, slotName” 不被支持时,会报出”slot does not exist”的错误。在这种情况下,取决于slot的父节点对应的组件如何处理这个值,请参考Component#appendSlot方法。 |
业务组件
| 类型 | 名称 | 继承的组件 | 功能解释 |
|---|---|---|---|
| 部件 | hand-button | xbutton | 手型工具按钮 |
| 部件 | selection-button | xbutton | 文本/注释选择工具按钮 |
| 部件 | snapshot-button | xbutton | 截图工具按钮 |
| 部件 | open-file-dropdown | dropdown | 打开文件下拉菜单 |
| 部件 | download-file-button | xbutton | 下载文件按钮 |
| 部件 | goto-prev-page-button | xbutton | 跳转到上一页按钮 |
| 部件 | goto-next-page-button | xbutton | 跳转到下一页按钮 |
| 部件 | goto-page-input | number | 页面跳转输入框 |
| 部件 | zoom-out-button | xbutton | 缩小页面按钮 |
| 部件 | zoom-in-button | xbutton | 放大页面按钮 |
| 部件 | editable-zoom-dropdown | dropdown | 可编辑的缩放下拉菜单 |
| 部件 | zoom-dropdown | dropdown | 缩放控制下拉菜单 |
| 部件 | continuous-page-button | xbutton | 连续页模式按钮 |
| 部件 | continuous-facing-page-button | xbutton | 多页连续页模式按钮 |
| 部件 | loupe-tool-button | xbutton | 放大镜(Loupe)工具按钮 |
| 部件 | marquee-tool-button | xbutton | Marquee 工具按钮 |
| 部件 | create-text-highlight-button | xbutton | 文本高亮工具按钮 |
| 部件 | create-strikeout-button | xbutton | 删除线工具按钮 |
| 部件 | create-underline-button | xbutton | 下划线工具按钮 |
| 部件 | create-squiggly-button | xbutton | 波浪线工具按钮 |
| 部件 | create-replace-button | xbutton | 替换文本工具按钮 |
| 部件 | create-caret-button | xbutton | 插入(caret)工具按钮 |
| 部件 | create-note-button | xbutton | 备注(Note)工具按钮 |
| 部件 | create-typewriter-button | xbutton | 打字机(typewriter)工具按钮 |
| 部件 | create-callout-button | xbutton | 注释框(Callout)工具按钮 |
| 部件 | create-textbox-button | xbutton | 文本框按钮 |
| 部件 | create-drawings-dropdown | dropdown | 图形工具下拉框按钮 |
| 部件 | create-pencil-button | xbutton | 铅笔工具按钮 |
| 部件 | eraser-button | xbutton | 橡皮擦工具按钮 |
| 部件 | create-area-highlight-button | xbutton | 区域高亮工具按钮 |
| 部件 | create-distance-button | xbutton | 距离工具按钮 |
| 部件 | create-attachment-button | xbutton | 附件工具按钮 |
| 部件 | create-image-button | xbutton | 图片工具按钮 |
| 部件 | create-link-button | xbutton | 链接 (link)工具按钮 |
| 部件 | stamp-dropdown | dropdown | 图章工具下拉列表框 |
| 部件 | add-image-button | xbutton | 添加图片工具按钮 |
| 部件 | ink-sign-dropdown | dropdown | 手写签名工具下拉框 |
| 部件 | create-stamp-dialog | layer | 创建图章弹出框 |
| 部件 | loupe-tool-dialog | layer | 放大镜(Loupe)工具弹出框 |
| 部件 | create-ink-sign-dialog | layer | 创建手写签名弹出框 |
| 部件 | bookmark-sidebar-panel | sidebar-panel | 侧边栏书签面板 |
| 部件 | commentlist-sidebar-panel | sidebar-panel | 侧边栏注释面板 |
| 部件 | thumbnail-sidebar-panel | sidebar-panel | 侧边栏缩略图面板 |
| 部件 | layer-sidebar-panel | sidebar-panel | 侧边栏图层面板 |
| 部件 | search-sidebar-panel | sidebar-panel | 侧边栏搜索面板 |
| 部件 | attachment-sidebar-panel | sidebar-panel | 侧边栏附件面板 |
| 容器 | page-contextmenu | contextmenu | PDF页面的右键菜单 |
| 容器 | annot-contextmenu | contextmenu | Annotation 默认右键菜单 |
| 容器 | action-annot-contextmenu | contextmenu | Image 和 link annotation的右键菜单 |
| 容器 | default-markup-contextmenu | contextmenu | Markup annotation右键菜单 |
| 容器 | fileattachment-contextmenu | contextmenu | Attachment annotation右键菜单 |
| 容器 | media-contextmenu | contextmenu | 视频/音频 (video/audio) 右键菜单 |
| 容器 | redact-contextmenu | contextmenu | 密文(redaction)右键菜单 |
| 容器 | textmarkup-contextmenu | contextmenu | Caret/highlight/strikeout/underline/squiggly/typewriter/callout/textbox右键菜单 |
| 部件 | contextmenu-item-annot-actions | contextmenu-item | 显示action设置对话框 |
| 部件 | contextmenu-item-apply-all | contextmenu-item | 应用所有的密文注释(redaction annotation) |
| 部件 | contextmenu-item-apply | contextmenu-item | 应用当前的密文注释(redaction annotation) |
| 部件 | contextmenu-item-copy-text | contextmenu-item | 复制当前annotation的content数据 |
| 部件 | contextmenu-item-delete-annot | contextmenu-item | 删除当前annotation |
| 部件 | contextmenu-item-hand-tool | contextmenu-item | 切换到hand工具右键菜单 |
| 部件 | contextmenu-item-marquee-zoom | contextmenu-item | 切换到放大镜(loupe)工具右键菜单 |
| 部件 | contextmenu-item-media-download | contextmenu-item | 下载当前多媒体数据流右键菜单 |
| 部件 | contextmenu-item-place | contextmenu-item | 应用当前密文(redaction)到其他页面右键菜单 |
| 部件 | contextmenu-item-properties | contextmenu-item | 显示当前annotation属性对话框右键菜单 |
| 部件 | contextmenu-item-reply | contextmenu-item | 回复当前annotation右键菜单 |
| 部件 | contextmenu-item-search | contextmenu-item | 显示搜索侧边栏右键菜单 |
| 部件 | contextmenu-item-select-tool | contextmenu-item | 切换到选择工具右键菜单 |
| 部件 | contextmenu-item-zoom-actual-size | contextmenu-item | 缩放到100%右键菜单 |
| 部件 | contextmenu-item-fitpage | contextmenu-item | 适合页面(fit page)右键菜单 |
| 部件 | contextmenu-item-fitwidth | contextmenu-item | 适合宽度(fit width)右键菜单 |
| 部件 | contextmenu-item-zoomin | contextmenu-item | 放大(zoom in)右键菜单 |
| 部件 | contextmenu-item-zoomout | contextmenu-item | 缩小(zoom out)右键菜单 |
| 容器 | text-sel:text-selection-tooltip | layer | 选择文本后显示的浮动框 |
| 容器 | freetext:freetext-tooltip | layer | 选中freetext annotation 后显示的浮动框 |
| 部件 | comment-list:toggle-commentlist-group-button | xbutton | 收缩/扩展commentlist panel上的comment group组件 (一个PDF页面中的comment属于同一个group) |
Add-on模块的业务组件
Add-on模块的业务组件仅在您工程集成了add-on相关模块时才有效,可以参阅3.4小节 “集成UIExtension的add-ons“。
| 类型 | 模块:名称 | 继承组件 | 所属Add-on模块 | 描述 |
|---|---|---|---|---|
| 部件 | print:print-button | xbutton | 显示打印对话框 | |
| 部件 | print:print-dialog | layer | 打印对话框 | |
| 部件 | import-form-module:import-form-button | xbutton | import-form | 导入form数据 |
| 部件 | export-form-module:export-form-dropdown | xbutton | export-form | 导出form数据 |
| 部件 | fpmodule:file-property-button | xbutton | file-property | 显示当前文档信息 |
| 部件 | fpmodule:file-property-dialog | layer | file-property | 文档信息对话框 |
| 部件 | multi-media:multi-media-button | xbutton | multi-media | 切换到创建多媒体Annotation工具 |
| 部件 | edit-pageobjects:edit-all-objects-button | xbutton | path-objects | 切换到页面对象(image/path/text)编辑工具 |
| 容器 | edit-pageobjects:page-objects-dropdown | dropdown | path-objects | 创建Path对象工具下拉框 |
| 部件 | edit-text-object:add-text-button | xbutton | text-object | 文本编辑 |
| 部件 | edit-text-object:text-bold-style-button | xbutton | text-object | 设置粗体字体 |
| 部件 | edit-text-object:text-italic-style-button | xbutton | text-object | 设置斜体字体 |
| 容器 | edit-text-object:font-color-picker | dropdown | text-object | 设置文本颜色下拉框 |
| 容器 | edit-text-object:font-style-dropdown | dropdown | text-object | 设置文本字体和大小下拉框 |
| 部件 | password-protect:password-protect-button | xbutton | password-protect | 打开加密对话框 |
| 部件 | password-protect:remove-protect-button | xbutton | password-protect | 移除密码保护 |
| 容器 | redaction:create-redactions-dropdown | dropdown | redaction | 密文(redaction)选项下拉框 |
| 部件 | redaction:apply-redactions-button | xbutton | redaction | 应用密文(redaction) |
| 部件 | redaction:redaction-search-button | xbutton | redaction | 打开左侧搜索面板 |
| 容器 | redaction:redaction-page-dialog | layer | redaction | 批量标记页面密文对话框。引用redaction Addon时必须在layout-template中添加该控件。 |
| 部件 | h-continuous:h-continuous-button | xbutton | h-continuous | 切换水平连续页模式 |
自定义国际化资源
自定义国际化资源,请按照如下的步骤:
- 在您的网站根目录新建一个名为 “assets” 的文件夹,该文件夹用来配置国际化资源。其路径是websiteRoot/assets/。
- 将SDK包中的lib/locals 文件夹拷贝到websiteRoot/assets/。
- 设置i18n路径来加载资源。
var pdfui = new UIExtension.PDFUI({
 i18n: {

absolutePath: 'websiteRoot/assets/locals'
 },

// Other options...
 });
- 添加更多本地化语言。在websiteRoot/assets/locals目录下新建一个文件夹,该文件夹的命名需要遵守语言代码标准,比如,中文需要命名为zh-CN,俄语需要命名为ru-RU。
- 将websiteRoot/assets/locales/en-US目录下的”ui_.json” 文件拷贝到上一步骤中新建的文件夹中。翻译(本地化) “ui_.json” 文件中的所有条目。
- 设置默认语言。
var pdfui = new UIExtension.PDFUI({
 il8n: {

absolutePath: 'websiteRoot/assets/locals'
 lng: 'ru-RU'
 },

// Other options...
 });
- 在开发环境中验证以上的配置。
- 清除浏览器缓存以确保加载最新的i18n 资源。
- 刷新浏览器,在DevTools中打开Network面板,检查ui_.json请求url是否指向您自定义的语言路径。如果是,则说明配置成功。
技术支持
问题报告
Foxit为其产品提供全天候24小时支持,并拥有PDF行业优秀的技术支持工程师开发团队。如果您在使用Foxit PDF SDK for Web时遇到任何技术问题或bug,请在http://tickets.foxitsoftware.com/create.php 网页上将问题报告提交给Foxit技术支持团队。为了更好地帮助您解决问题,请提供以下信息:
- 联系方式
- Foxit PDF SDK产品和版本
- 您使用的操作系统和IDE版本
- 问题的详细说明
- 任何其他相关信息,例如日志文件或错误信息截图
联系方式
您可以直接联系Foxit,请使用以下的联系方式:
线上支持:
联系销售:
- 电话: 1-866-680-3668
- 邮箱: sales@foxitsoftware.com
联系客服支持:
- 电话: 1-866-MYFOXIT 或者 1-866-693-6948
- 邮箱: support@foxitsoftware.com